您现在的位置是:网站首页> 编程资料编程资料
NodeJs Express中间件超详细讲解_node.js_
![]() 2023-05-24
348人已围观
2023-05-24
348人已围观
简介 NodeJs Express中间件超详细讲解_node.js_
什么是中间件
中间件(Middleware ),特指业务流程的中间处理环节
现实生活中的例子
在处理污水的时候,一般都要经过三个处理环节,从而保证处理过后的废水,达到排放标准
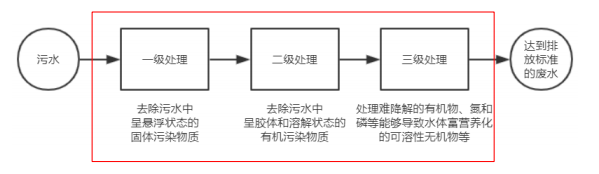
处理污水的这三个中间处理环节,就可以叫做中间件。
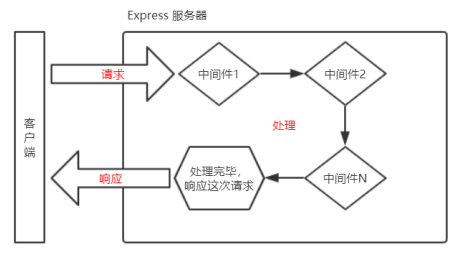
Express 中间件的调用流程
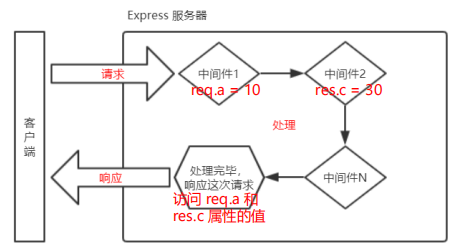
当一个请求到达 Express 的服务器之后,可以连续调用多个中间件,从而对这次请求进行预处理。
Express 中间件的格式
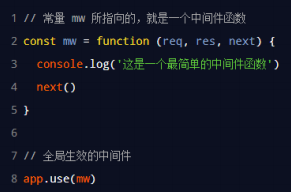
Express 的中间件,本质上就是一个 function 处理函数,Express 中间件的格式如下:
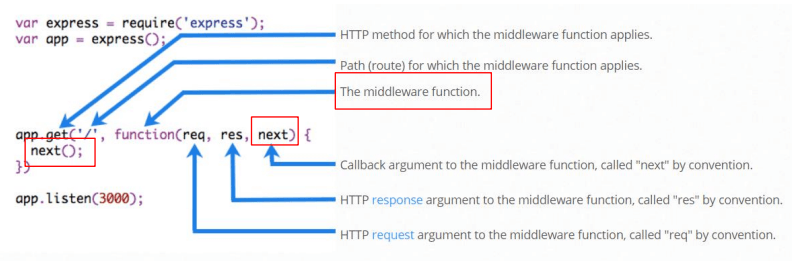
注意:中间件函数的形参列表中,必须包含 next 参数。而路由处理函数中只包含 req 和 res。
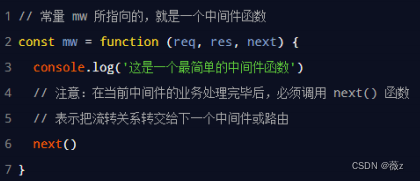
next 函数的作用
next 函数是实现多个中间件连续调用的关键,它表示把流转关系转交给下一个中间件或路由。

定义中间件函数
可以通过如下的方式,定义一个最简单的中间件函数:
全局生效的中间件
客户端发起的任何请求,到达服务器之后,都会触发的中间件,叫做全局生效的中间件。
通过调用 app.use(中间件函数),即可定义一个全局生效的中间件,示例代码如下:
定义全局中间件的简化形式

const express = require('express') const app = express() // // 定义一个最简单的中间件函数 // const mw = function (req, res, next) { // console.log('这是最简单的中间件函数') // // 把流转关系,转交给下一个中间件或路由 // next() // } // // 将 mw 注册为全局生效的中间件 // app.use(mw) // 这是定义全局中间件的简化形式 app.use((req, res, next) => { console.log('这是最简单的中间件函数') next() }) app.get('/', (req, res) => { console.log('调用了 / 这个路由') res.send('Home page.') }) app.get('/user', (req, res) => { console.log('调用了 /user 这个路由') res.send('User page.') }) app.listen(80, () => { console.log('http://127.0.0.1') })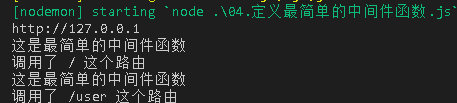
当在apifox请求这两个请求时,都会先调用这个中间件再返回请求的内容。
中间件的作用
多个中间件之间,共享同一份 req 和 res。基于这样的特性,我们可以在上游的中间件中,统一为 req 或 res 对象添加自定义的属性或方法,供下游的中间件或路由进行使用。
const express = require('express') const app = express() // 这是定义全局中间件的简化形式 app.use((req, res, next) => { // 获取到请求到达服务器的时间 const time = Date.now() // 为 req 对象,挂载自定义属性,从而把时间共享给后面的所有路由 req.startTime = time next() }) app.get('/', (req, res) => { res.send('Home page.' + req.startTime) }) app.get('/user', (req, res) => { res.send('User page.' + req.startTime) }) app.listen(80, () => { console.log('http://127.0.0.1') })定义多个全局中间件
可以使用 app.use() 连续定义多个全局中间件。客户端请求到达服务器之后,会按照中间件定义的先后顺序依次进行调用,示例代码如下:
const express = require('express') const app = express() // 定义第一个全局中间件 app.use((req, res, next) => { console.log('调用了第1个全局中间件') next() }) // 定义第二个全局中间件 app.use((req, res, next) => { console.log('调用了第2个全局中间件') next() }) // 定义一个路由 app.get('/user', (req, res) => { res.send('User page.') }) app.listen(80, () => { console.log('http://127.0.0.1') })
局部生效的中间件
不使用 app.use() 定义的中间件,叫做局部生效的中间件,示例代码如下:
// 导入 express 模块 const express = require('express') // 创建 express 的服务器实例 const app = express() // 1. 定义中间件函数 const mw1 = (req, res, next) => { console.log('调用了局部生效的中间件') next() } // 2. 创建路由,mw1只在当前路由生效 app.get('/', mw1, (req, res) => { res.send('Home page.') }) app.get('/user', (req, res) => { res.send('User page.') }) // 调用 app.listen 方法,指定端口号并启动web服务器 app.listen(80, function () { console.log('Express server running at http://127.0.0.1') })定义多个局部中间件
可以在路由中,通过如下两种等价的方式,使用多个局部中间件:

// 导入 express 模块 const express = require('express') // 创建 express 的服务器实例 const app = express() // 1. 定义中间件函数 const mw1 = (req, res, next) => { console.log('调用了第一个局部生效的中间件') next() } const mw2 = (req, res, next) => { console.log('调用了第二个局部生效的中间件') next() } // 2. 创建路由 app.get('/', [mw1, mw2], (req, res) => { res.send('Home page.') }) app.get('/user', (req, res) => { res.send('User page.') }) // 调用 app.listen 方法,指定端口号并启动web服务器 app.listen(80, function () { console.log('Express server running at http://127.0.0.1') })了解中间件的5个使用注意事项
① 一定要在路由之前注册中间件
② 客户端发送过来的请求,可以连续调用多个中间件进行处理
③ 执行完中间件的业务代码之后,不要忘记调用 next() 函数
④ 为了防止代码逻辑混乱,调用 next() 函数后不要再写额外的代码
⑤ 连续调用多个中间件时,多个中间件之间,共享 req 和 res 对象
中间件的分类
为了方便大家理解和记忆中间件的使用,Express 官方把常见的中间件用法,分成了 5 大类,分别是:
① 应用级别的中间件
② 路由级别的中间件
③ 错误级别的中间件
④ Express 内置的中间件
⑤ 第三方的中间件
应用级别的中间件
通过 app.use() 或 app.get() 或 app.post() ,绑定到 app 实例上的中间件,叫做应用级别的中间件,代码示例如下:
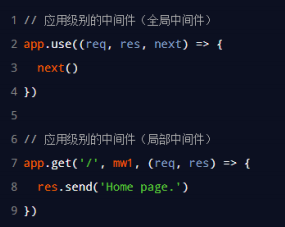
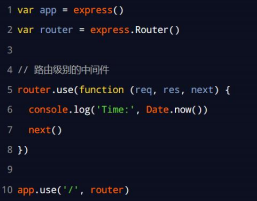
路由级别的中间件
绑定到 express.Router() 实例上的中间件,叫做路由级别的中间件。它的用法和应用级别中间件没有任何区别。只不过,应用级别中间件是绑定到 app 实例上,路由级别中间件绑定到 router 实例上,代码示例如下:
错误级别的中间件
错误级别中间件的作用:专门用来捕获整个项目中发生的异常错误,从而防止项目异常崩溃的问题。
格式:错误级别中间件的 function 处理函数中,必须有 4 个形参,形参顺序从前到后,分别是 (err, req, res, next)。
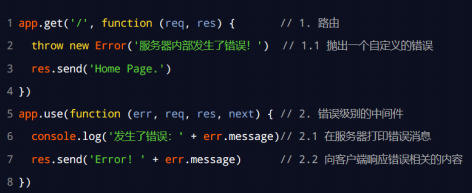
注意:错误级别的中间件,必须注册在所有路由之后!
// 导入 express 模块 const express = require('express') // 创建 express 的服务器实例 const app = express() // 1. 定义路由 app.get('/', (req, res) => { // 1.1 人为的制造错误 throw new Error('服务器内部发生了错误!') res.send('Home page.') }) // 2. 定义错误级别的中间件,捕获整个项目的异常错误,从而防止程序的崩溃 app.use((err, req, res, next) => { console.log('发生了错误!' + err.message) res.send('Error:' + err.message) }) // 调用 app.listen 方法,指定端口号并启动web服务器 app.listen(80, function () { console.log('Express server running at http://127.0.0.1') })Express内置的中间件
自 Express 4.16.0 版本开始,Express 内置了 3 个常用的中间件,极大的提高了 Express 项目的开发效率和体验:
① express.static 快速托管静态资源的内置中间件,例如: HTML 文件、图片、CSS 样式等(无兼容性)
② express.json 解析 JSON 格式的请求体数据(有兼容性,仅在 4.16.0+ 版本中可用)
③ express.urlencoded 解析 URL-encoded 格式的请求体数据(有兼容性,仅在 4.16.0+ 版本中可用)
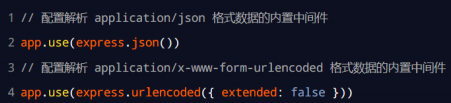
// 导入 express 模块 const express = require('express') // 创建 express 的服务器实例 const app = express() // 注意:除了错误级别的中间件,其他的中间件,必须在路由之前进行配置 // 通过 express.json() 这个中间件,解析表单中的 JSON 格式的数据 app.use(express.json()) // 通过 express.urlencoded() 这个中间件,来解析 表单中的 url-encoded 格式的数据 app.use(express.urlencoded({ extended: false })) app.post('/user', (req, res) => { // 在服务器,可以使用 req.body 这个属性,来接收客户端发送过来的请求体数据 // 默认情况下,如果不配置解析表单数据的中间件,则 req.body 默认等于 undefined console.log(req.body) res.send('ok') }) app.post('/book', (req, res) => { // 在服务器端,可以通过 req,body 来获取 JSON 格式的表单数据和 url-encoded 格式的数据 console.log(req.body) res.send('ok') }) // 调用 app.listen 方法,指定端口号并启动web服务器 app.listen(80, function () { console.log('Express server running at http://127.0.0.1') })第三方的中间件
非 Express 官方内置的,而是由第三方开发出来的中间件,叫做第三方中间件。在项目中,大家可以按需下载并配置
第三方中间件,从而提高项
相关内容
- 微信小程序实现登录注册界面_javascript技巧_
- 微信小程序实现本地分页加载_javascript技巧_
- NodeJs Express框架实现服务器接口详解_node.js_
- Openlayers实现根据半径绘制圆形_javascript技巧_
- vue3项目新用户引导组件driver.js示例详解_vue.js_
- NodeJs操作MYSQL方法详细介绍_node.js_
- Vue 2阅读理解之initRender与callHook组件详解_vue.js_
- 手写实现vue2下拉菜单dropdown组件实例_vue.js_
- JavaScript中如何在一个循环中等待示例代码详解_javascript技巧_
- 微信小程序实现分页功能_javascript技巧_


